Workflow starter kit
Demonstrates how to build visual programming interfaces with node-based workflows on infinite canvas. Features an interactive workflow system where users can create, connect, and execute nodes. Includes node and connection shapes, port-based bindings, a graph execution engine, and data flow between nodes.
To build with a workflow starter kit, run this command in your terminal:
npm create tldraw@latest -- --template workflowUse cases
Use the Workflow Starter Kit to build:
AI and agentic workflows
Build visual AI pipelines where agents process data through connected nodes.
Automation platforms
Create no-code automation tools where users visually connect services and data transformations.
Data processing pipelines
Design ETL tools where users drag nodes to transform, filter, and route data between sources and destinations.
Visual programming interfaces
Build domain-specific scripting environments where complex logic becomes intuitive drag-and-drop workflows.
Interactive diagramming tools
Create specialized diagram builders for database design, circuit boards, or business process flows with executable functionality.
How it works
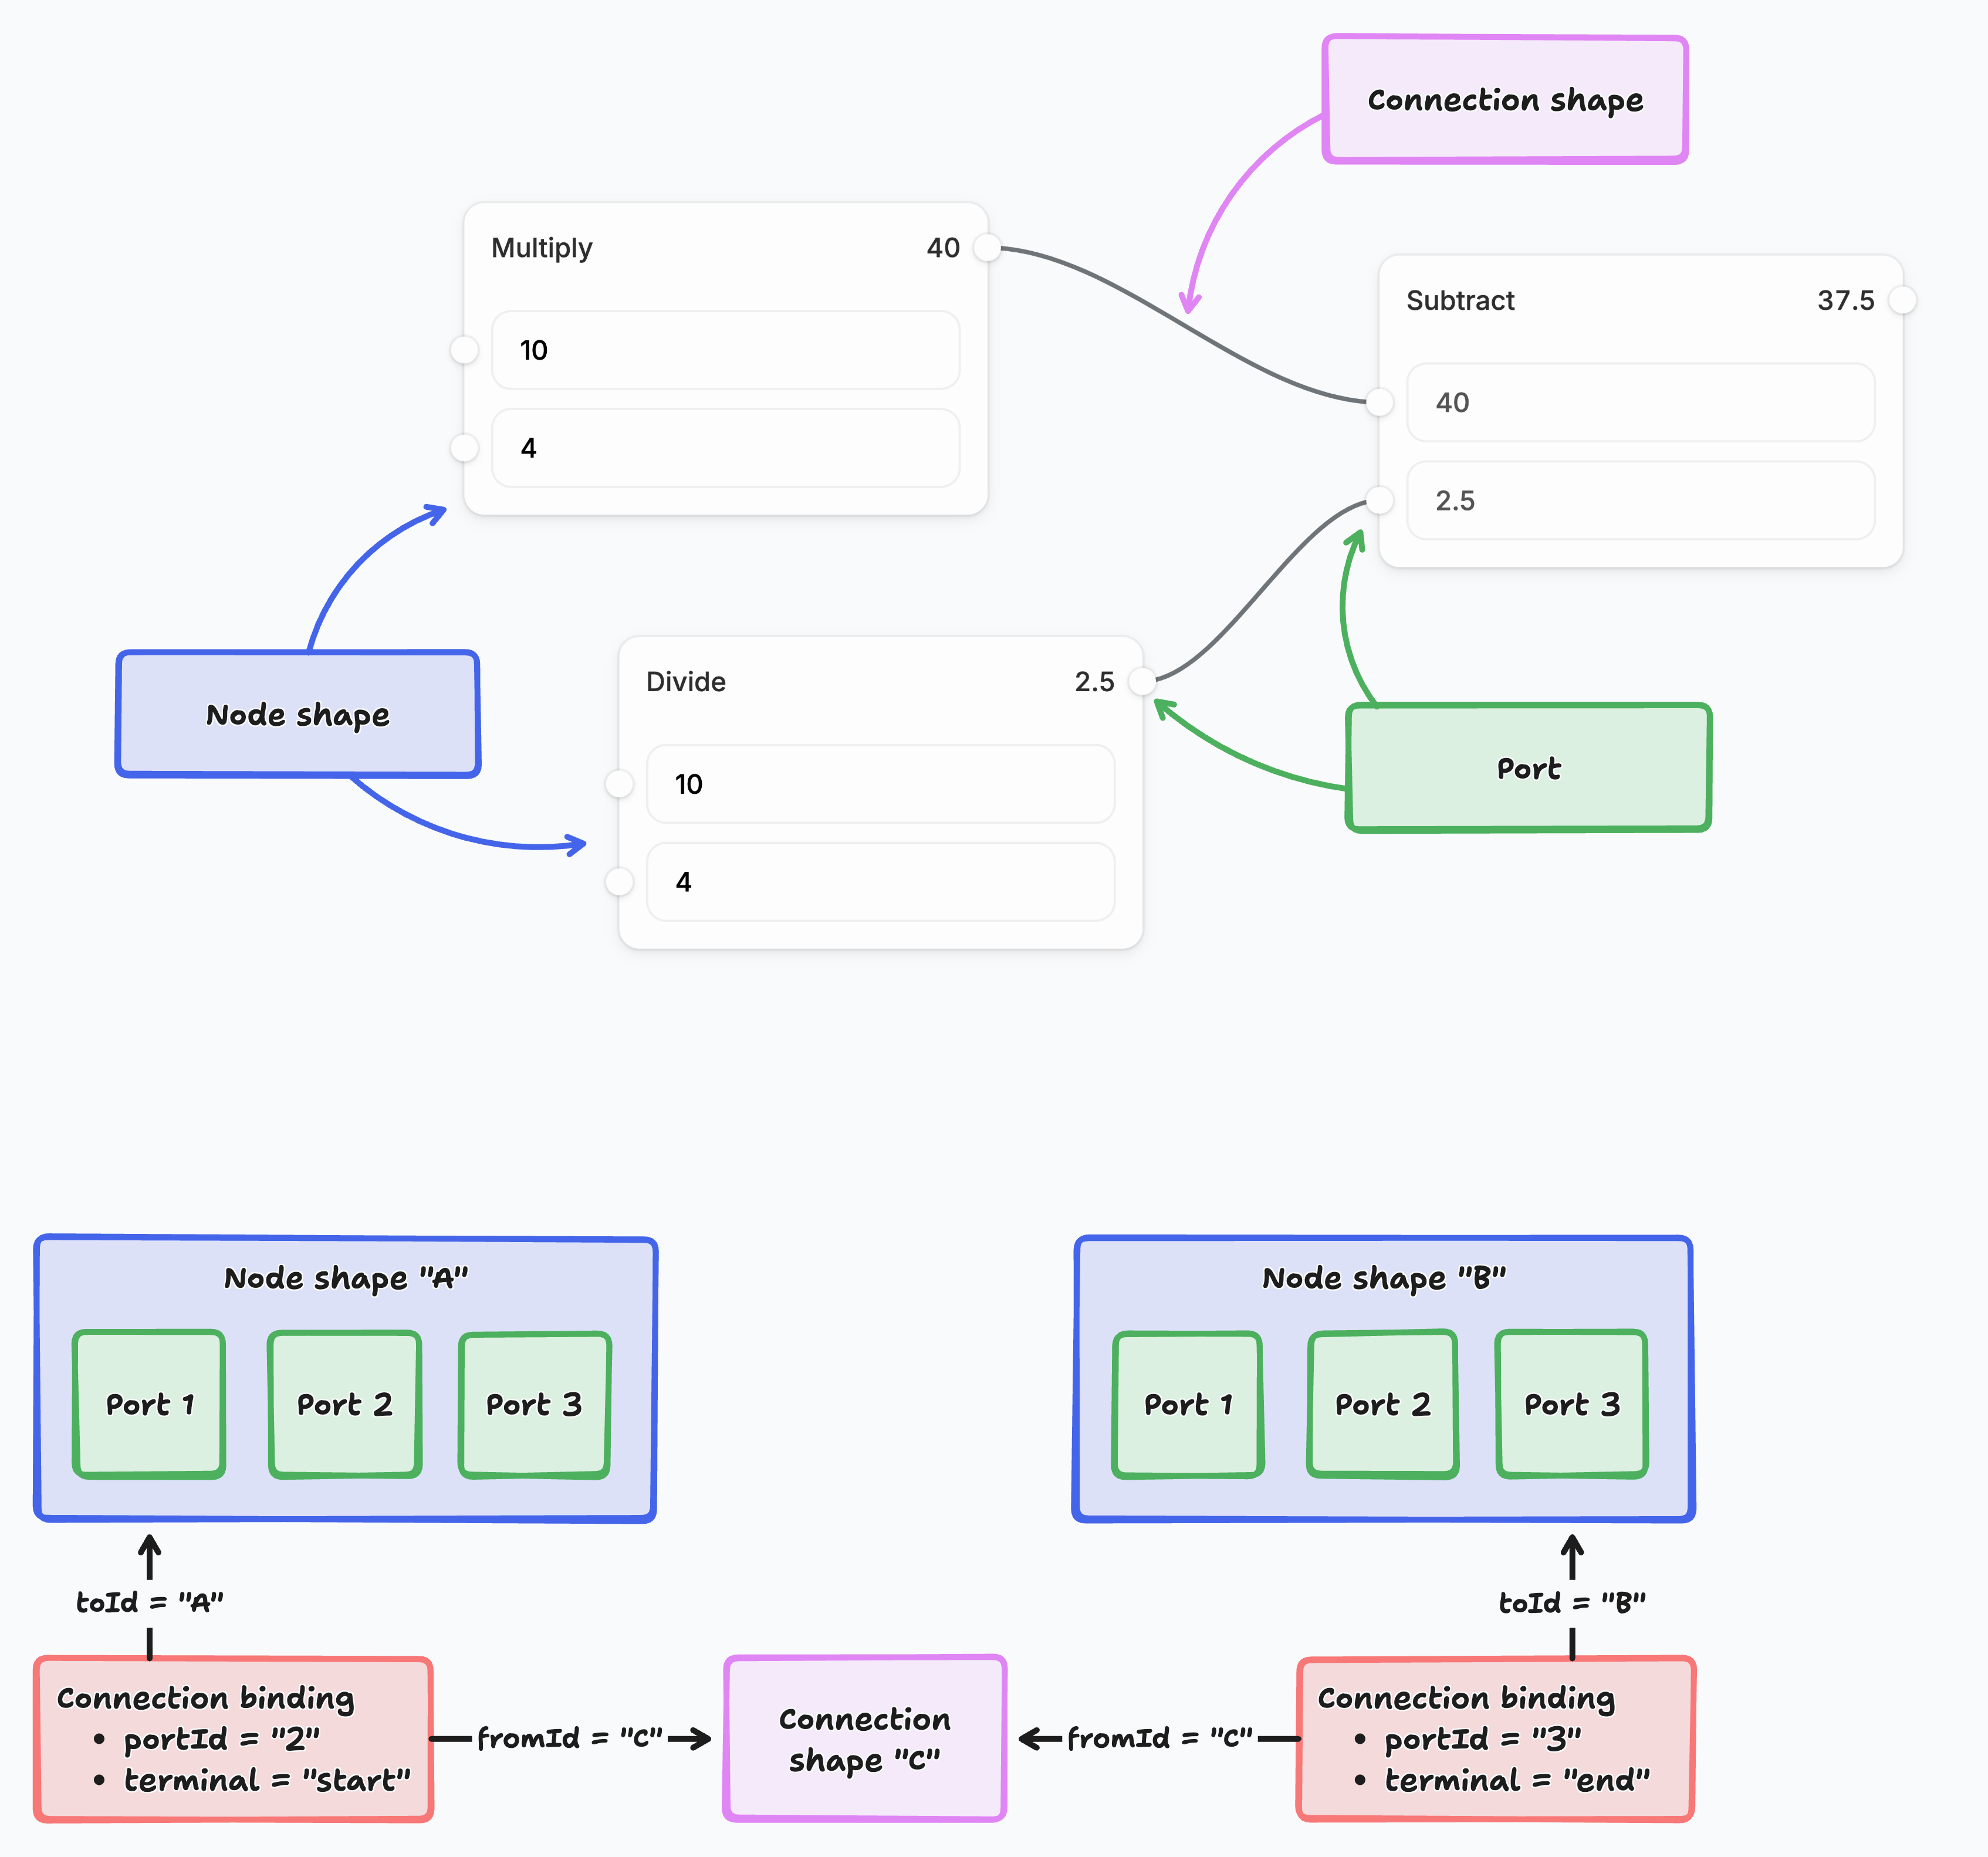
1. Shape system: Nodes and connections
Nodes are custom tldraw shapes that represent workflow steps. Each node has input and output ports defined in its shape utility, and new node types can be created or customized. Nodes accept inputs and produce outputs, which can be joined together with connections. Connections are also shapes, but they use tldraw's binding system to stay attached to specific ports on nodes.
2. Binding system: Smart connections
When you create a connection between nodes, tldraw's binding system tracks the relationship. To create a connection, drag from a port. If you move a node, its connections update automatically. You can also drag an existing connection to reconnect it elsewhere or disconnect it entirely. The binding utilities handle connection lifecycle as nodes change.
3. Interaction layer: Port tools
The starter kit extends tldraw's select tool with custom port interactions. When you click or drag near a port, the PointingPort tool activates. You can create connections by dragging from any port, or click an output port to open a node picker and insert a new connected node. These behaviors are implemented using tldraw's state machine system, where tools are organized as states that can have child states.
4. Execution engine
The execution system is designed to be replaced by your own business logic. It reads your node graph, resolves dependencies (which nodes need to run before others), and executes them in the correct order. Nodes expose their computation through a simple interface, and the engine handles the orchestration. You can run a workflow graph (for example, using a "Play" action) to see how information flows between nodes.
5. Data flow and processing
You control the data that flows through your workflow and what happens to it. The starter kit provides the infrastructure: nodes update instantly to show their results as data flows through the connections. The framework moves data between nodes and triggers updates when values change. Your data can come from user inputs, external APIs, databases, or file uploads.
Customization
Adding custom nodes
To add custom node types, create a new file in src/nodes/types. The easiest way is to duplicate an existing node, like MultiplyNode.tsx.
Start by defining the type of your node:
import { T } from 'tldraw'

// First, we create a validator for our node type
export const CustomNode = T.object({
	type: T.literal('custom'), // each node needs a unique "type"
	someData: T.number,
	// ...
})

// Then, we can derive a typescript type from the validator
export type CustomNode = T.TypeOf<typeof CustomNode>Once you have your node’s type definition, create a node definition for it:
export class CustomNodeDefinition extends NodeDefinition<CustomNode> {
	static type = 'custom' // This must match "type" from above
	static validator = CustomNode

	// How to label your node in the UI
	title = 'My custom node'
	heading = 'Custom' // Shown in the node header
	icon = <span>🐝</span>

	// Return a default version of your node
	getDefault() { ... }

	// Return the height of your node, in pixels
	getBodyHeightPx(shape, node) { ... }

	// Return all ports for your node. Each port has a terminal:
	// 'end' = input port (receives data), 'start' = output port (sends data)
	getPorts(shape, node) { ... }

	// Run this node! Work through the input port values and
	// produce values for the output ports.
	async execute(shape, node, inputs) { ... }

	// Get values to use as outputs when we're NOT running
	// this node. Often, you might return a previously computed
	// value from `execute`.
	getOutputInfo(shape, node, inputs) { ... }

	// A react component for rendering your node on the canvas.
	Component = CustomNodeComponent
}

function CustomNodeComponent({ shape, node }) {
  return <div>...</div>
}Next, add your node definition to the system. In src/nodes/nodeTypes.tsx, include it in NodeDefinitions. Finally, add your node to the UI: open src/components/WorkflowToolbar.tsx and insert a <ToolbarItem tool="node-custom" /> wherever you’d like your node to appear in the toolbar. If your node has any input ports (terminal = end), you can also add an OnCanvasComponentPickerItem for it in src/components/OnCanvasComponentPicker.
Data fetching and integrations
Adding data fetching or integrations to a node is straightforward. You can make fetch requests from your custom node’s execute method. See src/nodes/types/EarthquakeNode.tsx for an example of a node that, when run, fetches recent earthquakes from the USGS API. Once fetched, it picks a random earthquake, displays some data, and outputs the magnitude to be used in downstream nodes.
You may also want to store data from the last execution to display in the UI. In the earthquake example, the data is stashed in an earthquakeData prop in the node definition. In execute, the shape is updated to store this data. Then, both the UI and getOutputInfo can reference it.
Extending execution
Because it’s just a demo, this starter kit has a very minimal execution model: values are either numbers or a special STOP_EXECUTION flag used to implement conditionals.
If you want to change the type of data flowing through the system, edit WorkflowValue in src/nodes/types/shared.tsx. You’ll need to resolve type errors elsewhere, since several places assume the system only works with numbers.
The execution system is defined in src/execution/ExecutionGraph.tsx. It’s designed to be easily replaced by your own custom engine. For example, you might want executions to run entirely server-side, or you might want to “test” nodes individually from the canvas and then “deploy” a running workflow as an automation on a server.
UI customization
Customizing tldraw’s UI mostly works by replacing specific components. Take a look at src/App.tsx to see how we diverge from tldraw’s default UI:
- We add the on-canvas component picker and workflow outline/play buttons in
InFrontOfTheCanvas. - We add a custom vertical toolbar to the left of the screen and some extra actions in the bottom of the screen in
Toolbar. - We remove the
MenuPanelentirely. - We selectively hide the
StylePaneldepending on what’s selected.
To further customize the UI of this starter kit, read up on customizing tldraw’s UI as a whole.
Further reading
- Shape Utilities: Learn how to create custom shapes and extend tldraw's shape system with advanced geometry, rendering, and interaction patterns.
- Binding System: Learn more about tldraw's binding system for creating relationships between shapes, automatic updates, and connection management.
- Editor State Management: Learn how to work with tldraw's reactive state system, editor lifecycle, and event handling for complex canvas applications.
- Customize the user interface: Learn how to customize the user interface of your tldraw application.
Building with this starter kit?
If you build something great, please share it with us in our #show-and-tell channel on Discord. We want to see what you've built!