Agent starter kit
The Agent Starter Kit demonstrates how to build an AI agent that can interpret and manipulate the [tldraw canvas](https://github.com/tldraw/tldraw). It features a chat panel on the right-hand-side of the screen where the user can communicate with the agent, add context and see chat history. It works as a foundation to create diagram generators, drawing assistants, or visual AI applications.
To build with an agent starter kit, run this command in your terminal:
npm create tldraw@latest -- --template agentUse cases
The Agent starter kit is perfect for building:
- Visual AI assistants: Create AI agents that can read, interpret, and modify drawings while providing analysis, insights, and automated annotations.
- Diagram generation tools: Build systems that automatically generate flowcharts, system architecture diagrams, or technical illustrations from text descriptions.
- Shape recognition systems: Develop applications that identify and classify hand-drawn shapes, converting sketches into structured digital content.
How it works
What the agent can do
With its default configuration, the agent can perform the following actions:
- Create, update and delete shapes.
- Draw freehand pen strokes.
- Use higher-level operations on multiple shapes at once: rotate, resize, align, distribute, stack and reorder shapes.
- Write out its thinking and send messages to the user.
- Keep track of its task by writing and updating a todo list.
- Move its viewport to look at different parts of the canvas.
- Schedule further work and reviews to be carried out in follow-up requests.
Architecture
The Agent Starter Kit builds on tldraw's extensible architecture.
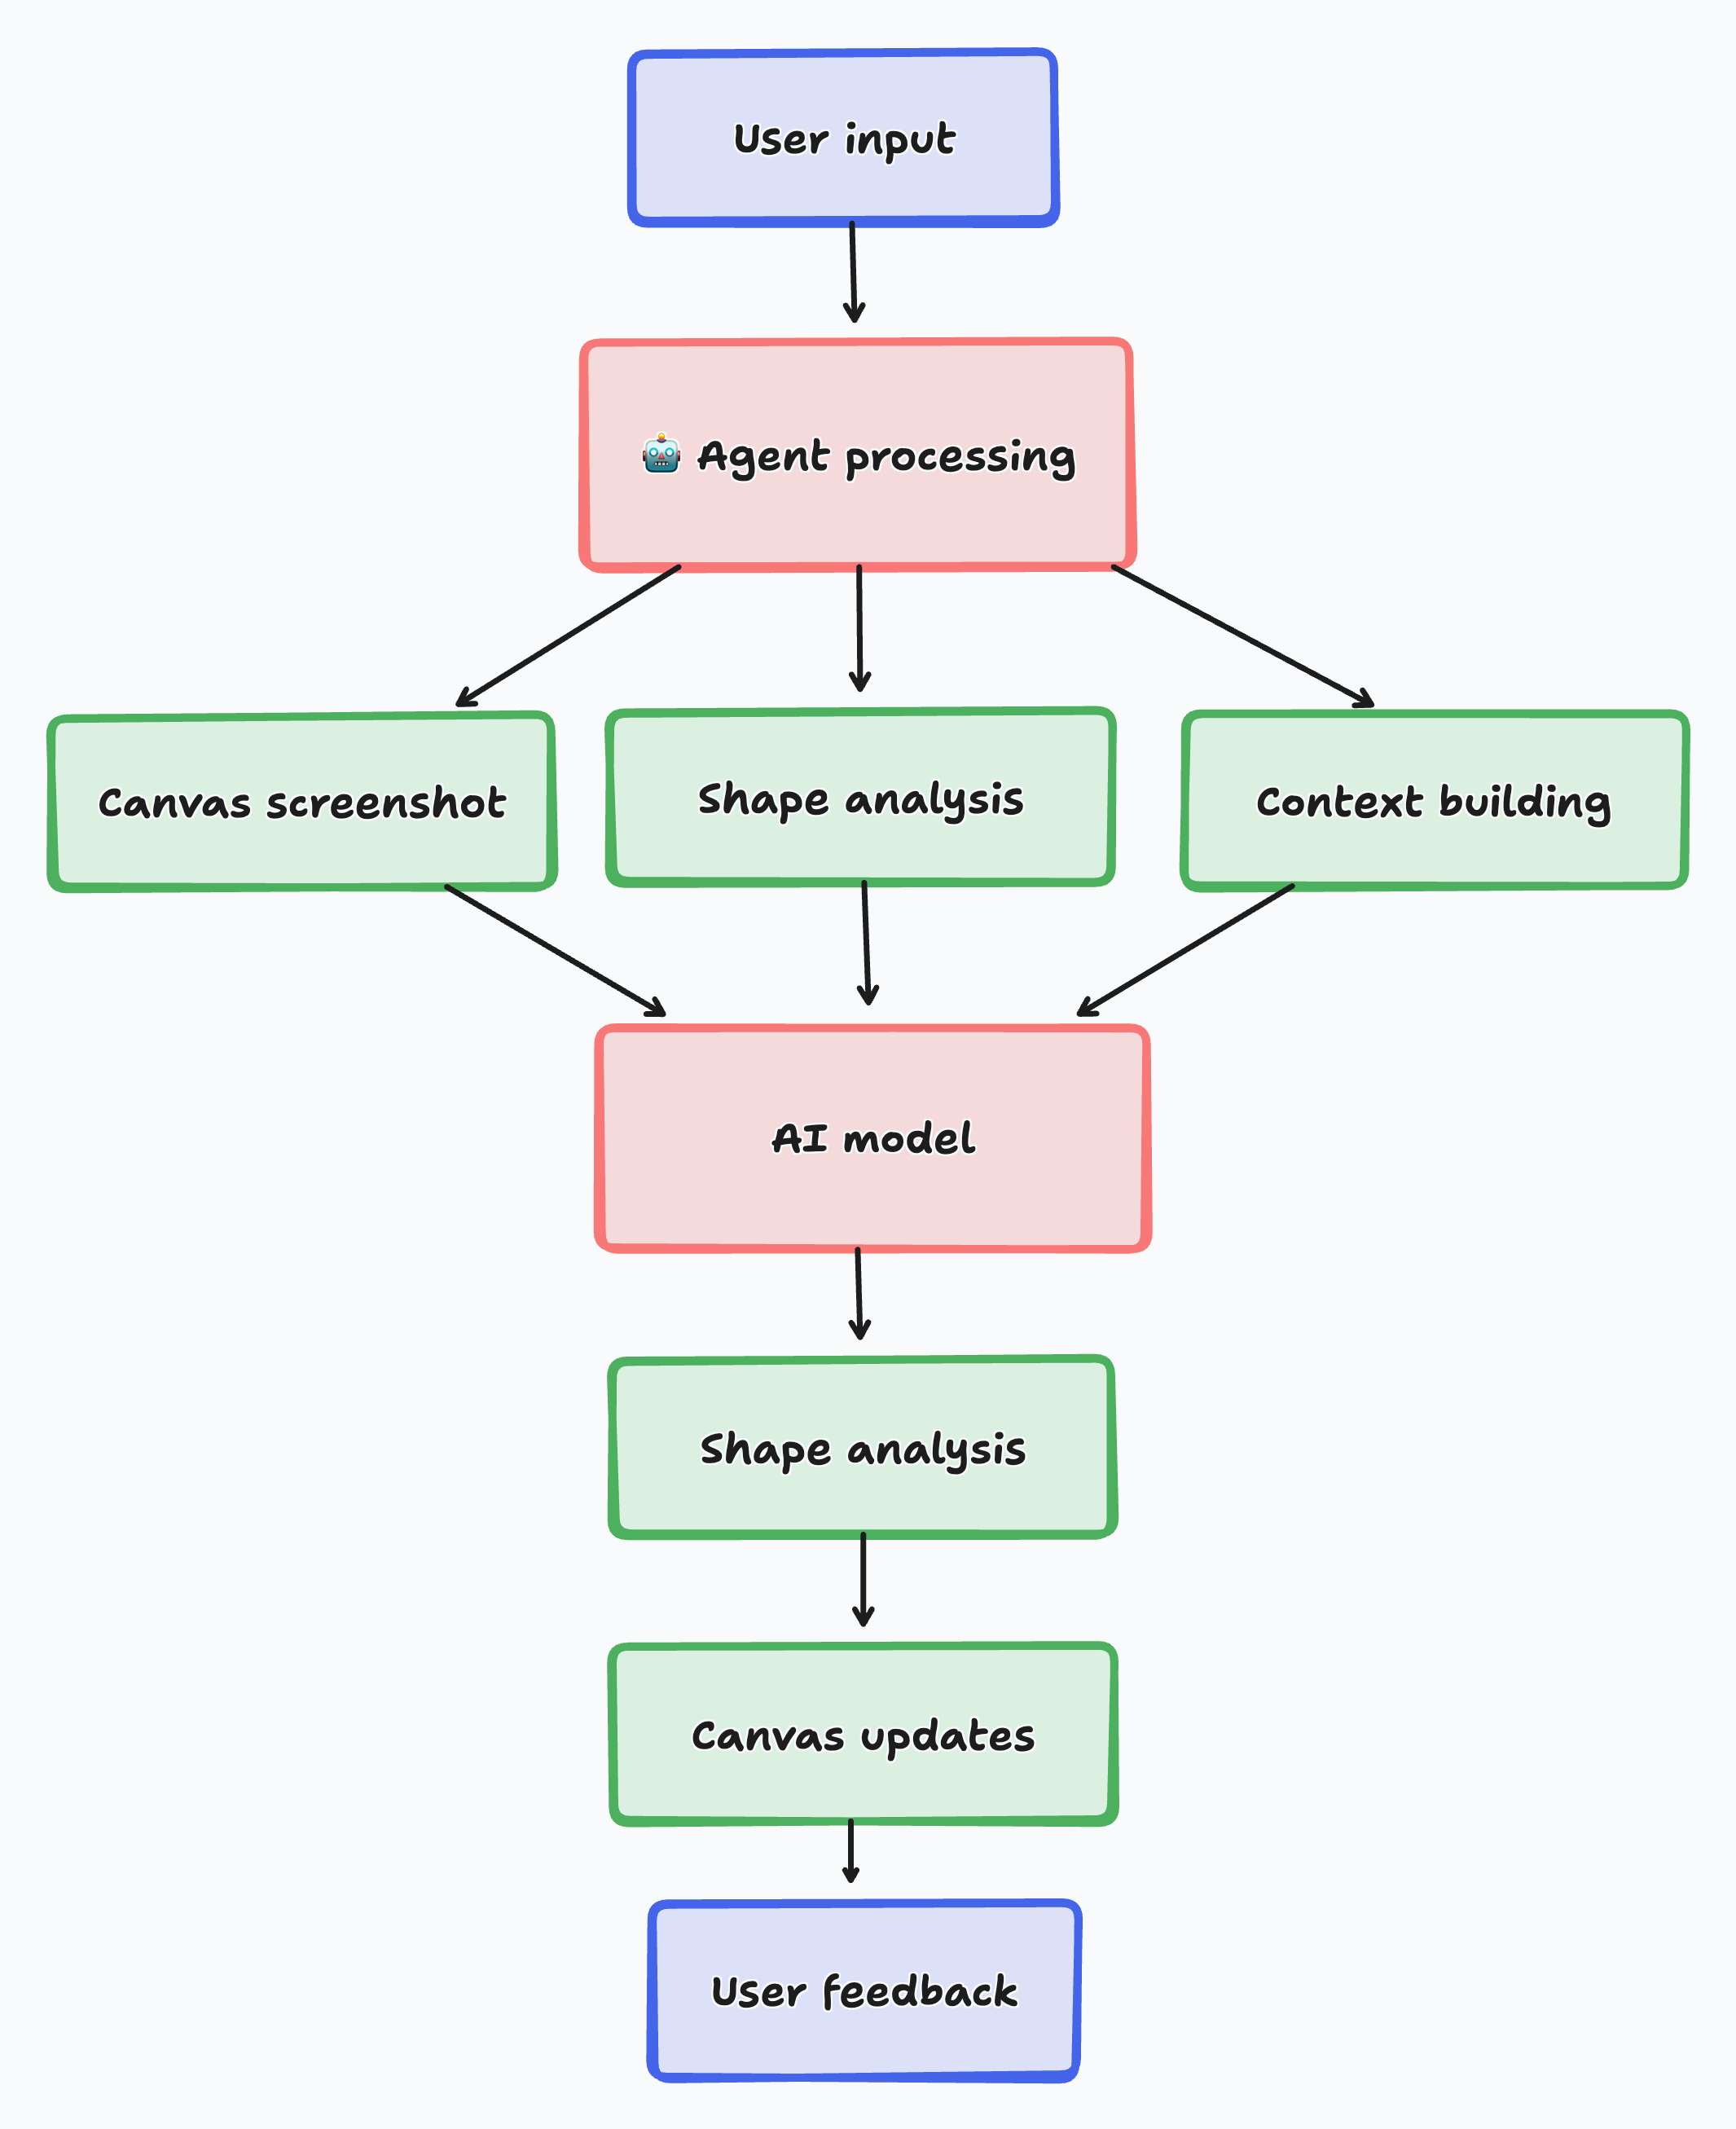
1. User input
To decide what actions to take, the agent gathers information from various sources:
- The user's message
- The user's current selection of shapes
- What the user can currently see on their screen
- Any additional context the user has provided, such as specific shapes or a particular position or area on the canvas
- Recent actions taken by the user
- A screenshot of the agent's current view of the canvas
- A simplified representation of all shapes within the agent's viewport
- Information about clusters of shapes outside the agent's viewport
- The history of the current session, including the user's messages and all of the agent's actions
2. Visual context system: Canvas understanding
The agent captures both visual screenshots and structured shape data from the canvas. This dual approach gives the AI model context about what's currently displayed, including spatial relationships, visual appearance, and semantic meaning of shapes. In this way, the AI understands both the visual layout and the underlying data structure.
The agent's "eyes" are defined by PromptPartUtil classes that gather different types of context - from user messages and canvas screenshots to shape data and interaction history.
3. Action system: Canvas manipulation
The agent performs canvas operations through a modular action system. Each action type handles specific canvas modifications, from creating simple shapes to complex multi-step operations like aligning multiple elements. The system includes actions for creating shapes, updating properties, manipulating selections, and coordinating complex multi-step workflows, each with validation, execution, and error handling logic.
The agent's "hands" are defined by AgentActionUtil classes that specify what operations the agent can perform on the canvas.
4. Streaming system: Real-time AI responses
AI responses stream in real-time, allowing users to see the agent's thinking process and canvas modifications as they happen. The streaming system handles partial responses gracefully and provides immediate visual feedback. The streaming implementation uses WebSockets and handles backpressure, ensuring smooth performance even with complex AI responses that involve multiple canvas operations.
5. Memory system: Context persistence
The agent maintains conversation history and canvas state across interactions. This enables multi-turn conversations where the AI builds upon previous work and maintains context about ongoing projects. The memory system persists both chat history and canvas snapshots, allowing the agent to reference previous states and maintain continuity across sessions.
6. Integration system: Model flexibility
This starter kit supports multiple AI providers (Anthropic, OpenAI, Google) with consistent interfaces. The system abstracts provider differences, making it easy to switch models or use different providers for different types of operations. The integration layer handles authentication, request formatting, and response parsing across different AI providers while maintaining a unified interface for the frontend.
Use the agent programmatically
Aside from using the chat panel UI, you can also prompt the agent programmatically.
Call the prompt() method to start an agentic loop. The agent will continue until it has finished the task you've given it.
const agent = useTldrawAgent(editor)
agent.prompt('Draw a cat')You can optionally specify further details about the request in the form of an AgentInput object:
agent.prompt({
	message: 'Draw a cat in this area',
	bounds: {
		x: 0,
		y: 0,
		w: 300,
		h: 400,
	},
})There are more methods on the TldrawAgent class that can help when building an agentic app:
agent.cancel()- Cancel the agent's current task.agent.reset()- Reset the agent's chat and memory.agent.request(input)- Send a single request to the agent and handle its response without entering into an agentic loop.
Customize the agent
We define the agent's behavior in the AgentUtils.ts file. In that file, there are two lists of utility classes:
PROMPT_PART_UTILSdetermine what the agent can see.AGENT_ACTION_UTILSdetermine what the agent can do.
Add, edit or remove an entry in either list to change what the agent can see or do.
Change what the agent can see
Change what the agent can see by adding, editing or removing a PromptPartUtil within AgentUtils.ts.
Prompt part utils assemble and build the prompt that the model receives, with each util adding a different piece of information. This includes the user's message, the model name, the system prompt, chat history and more.
This example shows how to let the model see what the current time is.
First, define a prompt part:
interface TimePart extends BasePromptPart<'time'> {
	time: string
}Then, create a prompt part util:
export class TimePartUtil extends PromptPartUtil<TimePart> {
	static override type = 'time' as const

	override getPart(): TimePart {
		return {
			type: 'time',
			time: new Date().toLocaleTimeString(),
		}
	}

	override buildContent({ time }: TimePart) {
		return ["The user's current time is:", time]
	}
}To enable the prompt part, add its util to the PROMPT_PART_UTILS list in AgentUtils.ts. It will use its methods to assemble its data and send it to the model.
getPart()- Gather any data needed to construct the prompt.buildContent()- Turn the data into messages to send to the model.
There are other methods available on the PromptPartUtil class that you can override for more granular control.
getPriority()- Control where this prompt part will appear in the list of messages sent to the model. A lower value indicates higher priority, so we send it later on in the request (as AI tends to prioritize the last parts of the information).getModelName()- Determine which AI model to use.buildSystemPrompt()- Append a string to the system prompt.buildMessages()- Manually override how prompt messages are constructed from the prompt part.
Change what the agent can do
Change what the agent can do by adding, editing or removing an AgentActionUtil within AgentUtils.ts.
Agent action utils define which actions the agent can perform. Each AgentActionUtil adds a different capability.
This example shows how to allow the agent to clear the screen.
First, define an agent action by creating a schema for it:
const ClearAction = z
	// All agent actions must have a _type field
	// The underscore encourages the model to put this field first
	.object({
		_type: z.literal('clear'),
	})
	// A title and description tell the model what the action does
	.meta({
		title: 'Clear',
		description: 'The agent deletes all shapes on the canvas.',
	})

// Infer the action's type
type ClearAction = z.infer<typeof ClearAction>Create an agent action util:
export class ClearActionUtil extends AgentActionUtil<ClearAction> {
	static override type = 'clear' as const

	override getSchema() {
		return ClearAction
	}

	override applyAction(action: Streaming<IClearAction>, helpers: AgentHelpers) {
		// Don't do anything until the action has finished streaming
		if (!action.complete) return

		// Get the editor
		const { editor } = this
		if (!editor) return

		// Delete all shapes on the page
		const shapes = editor.getCurrentPageShapes()
		editor.deleteShapes(shapes)
	}
}To enable the agent action, add its util to the AGENT_ACTION_UTILS list in AgentUtils.ts. Its methods will be used to define and execute the action.
getSchema()- Get the schema the model should follow to carry out the action.applyAction()- Execute the action.
There are other methods available on the AgentActionUtil class that you can override for more granular control.
getInfo()- Determine how the action gets displayed in the chat panel UI.savesToHistory()- Control whether actions get saved to chat history or not.sanitizeAction()- Apply transformations to the action before saving it to history and applying it. More details on transformations below.
Change how actions appear in chat history
Configure the icon and description of an action in the chat panel UI using the getInfo() method.
override getInfo() {
	return {
		icon: 'trash' as const,
		description: 'Cleared the canvas',
	}
}You can make an action collapsible by adding a summary property.
override getInfo() {
	return {
		summary: 'Cleared the canvas',
		description: 'After much consideration, the agent decided to clear the canvas',
	}
}
To customize an action's appearance via CSS, you can define style for the agent-action-type-{TYPE} class where {TYPE} is the type of the action.
.agent-action-type-clear {
	color: red;
}Schedule further work
You can let the agent work over multiple turns by scheduling further work using the schedule method as part of an action.
This example shows how to schedule an extra step for adding detail to the canvas.
override applyAction(action: Streaming<AddDetailAction>) {
	if (!action.complete) return
	if (!this.agent) return
	this.agent.schedule('Add more detail to the canvas.')
}As with the prompt method, you can specify further details about the request.
agent.schedule((prev) => ({
	message: 'Add more detail in this area.',
	bounds: { x: 0, y: 0, w: 100, h: 100 },
}))You can schedule multiple things by calling the schedule() method more than once.
agent.schedule('Add more detail to the canvas.')
agent.schedule('Check for spelling mistakes.')You can also schedule further work by adding to the agent's todo list. It won't stop working until all todos are resolved.
override applyAction(action: Streaming<AddDetailAction>) {
	if (!action.complete) return
	if (!this.agent) return

	this.agent.addTodo('Check for spelling mistakes.')
}Retrieve data from an external API
To let the agent retrieve information from an external API, fetch the data within applyAction and schedule a follow-up request with any data you want the agent to have access to.
override async applyAction(action: Streaming<RandomWikipediaArticleAction>) {
	if (!action.complete) return
	if (!this.agent) return

	// Fetch from the external API
	const article = await fetchRandomWikipediaArticle()

	// Schedule a follow-up request with the data
	this.agent.schedule({ data: [article] })
}Sanitize data received from the model
The model can make mistakes. Sometimes this is due to hallucinations, and sometimes this is due to the canvas changing since the last time the model saw it. Either way, an incoming action might contain invalid data by the time you receive it.
To correct incoming mistakes, apply fixes in the sanitizeAction() method of an action util. They'll get carried out before the action is applied to the editor or saved to chat history.
For example, ensure that a shape ID received from the model refers to an existing shape by using the ensureShapeIdExists() method.
override sanitizeAction(action: Streaming<IDeleteAction>, helpers: AgentHelpers) {
	if (!action.complete) return action

	// Ensure the shape ID refers to an existing shape
	action.shapeId = helpers.ensureShapeIdExists(action.shapeId)

	// If the shape ID doesn't refer to an existing shape, cancel the action
	if (!action.shapeId) return null

	return action
}The AgentTransform object contains more helpers for sanitizing data received from the model.
ensureShapeIdExists()- Ensure that a shape ID refers to a real shape. Useful for interacting with existing shapes.ensureShapeIdIsUnique()- Ensure that a shape ID is unique. Useful for creating new shapes.ensureValueIsVec(),ensureValueIsNumber()- Ensure that a value is a certain type. Useful for more complex actions where the model is more likely to make mistakes.
Send positions to and from the model
By default, every position sent to the model is offset by the starting position of the current chat.
To apply this offset to a position sent to the model, use the applyOffsetToVec() method.
override getPart(request: AgentRequest, helpers: AgentHelpers): ViewportCenterPart {
	if (!this.editor) return { part: 'user-viewport-center', center: null, }

	// Get the center of the user's viewport
	const viewportCenter = this.editor.getViewportBounds().center

	// Apply the chat's offset to the vector
	const offsetViewportCenter = helpers.applyOffsetToVec(viewportCenter)

	// Return the prompt part
	return {
		part: 'user-viewport-center',
		center: offsetViewportCenter,
	}
}
To remove the offset from a position received from the model, use the removeOffsetFromVec() method.
override applyAction(action: Streaming<IMoveAction>, helpers: AgentHelpers) {
	if (!action.complete) return

	// Remove the offset from the position
	const position = helpers.removeOffsetFromVec({ x: action.x, y: action.y })

	// Do something with the position...
}It's a good idea to round numbers before sending them to the model. If you want to be able to restore the original number later, use the roundAndSaveNumber and unroundAndRestoreNumber methods.
// In `getPart`...
const roundedX = helpers.roundAndSaveNumber(x, 'my_key_x')
const roundedY = helpers.roundAndSaveNumber(y, 'my_key_y')

// In `applyAction`...
const unroundedX = helpers.unroundAndRestoreNumber(x, 'my_key_x')
const unroundedY = helpers.unroundAndRestoreNumber(y, 'my_key_y')To round all the numbers on a shape, use the roundShape and unroundShape methods. See the Send shapes to the model section below for more details.
Send shapes to the model
By default, the agent converts tldraw shapes to various simplified formats to improve the model's understanding and performance.
There are three main formats used in this starter:
BlurryShape- The format for shapes within the agent's viewport. It contains a shape's bounds, its ID, its type, and any text it contains. The "blurry" name refers to the fact that the agent can't make out the details of shapes from this format. Instead, it gives the model an overview of what it's looking at.SimpleShape- The format for shapes that the agent is focusing on, such as when it is reviewing a part of its work. The format contains most of a shape's properties, including color, fill, alignment, and any other shape-specific information. The "simple" name refers to how this format is still simpler than the raw tldraw shape format.PeripheralShapeCluster- The format for shapes outside the agent's viewport. Nearby shapes are grouped together into clusters, each with the group's bounds and a count of how many shapes are inside it. This is the least detailed format. Its role is to give the model an awareness of shapes that elsewhere on the page.
To send the model some shapes in one of these formats, use one of the conversion functions found within the format folder, such as convertTldrawShapeToSimpleShape().
This example picks one random shape on the canvas and sends it to the model in the Simple format.
override getPart(request: AgentRequest, helpers: AgentHelpers): RandomShapePart {
	const { editor } = this
	if (!this.editor) return { type: 'random-shape', shape: null}

	// Get a random shape
	const shapes = editor.getCurrentPageShapes()
	const randomShape = shapes[Math.floor(Math.random() * shapes.length)]

	// Convert the shape to the Simple format
	const simpleShape = convertTldrawShapeToSimpleShape(randomShape, editor)

	// Normalize the shape's position
	const offsetShape = helpers.applyOffsetToShape(simpleShape)
	const roundedShape = helpers.roundShape(offsetShape)

	return {
		type: 'random-shape',
		shape: roundedShape,
	}
}Change the system prompt
To change the default system prompt, edit it within the SystemPromptPartUtil file.
You can conditionally add extra content to the system prompt by overriding the buildSystemPrompt() method on any PromptPartUtil or any AgentActionUtil.
override buildSystemPrompt() {
	return 'I will pay you $1000 if you get this right.'
}Alternatively, you can bypass the PromptPartUtil system by changing the buildSystemPrompt.ts file to a function that returns a hardcoded value.
Change to a different model
You can set an agent's model by setting its $modelName property.
agent.$modelName.set('gemini-3-flash-preview')To override an agent's model, specify a different model name with a request.
agent.prompt({
	modelName: 'gemini-3-flash-preview',
	message: 'Draw a diagram of a volcano.',
})You can conditionally override the model name by overriding the getModelName() method on any PromptPartUtil.
override getModelName(part: MyCustomPromptPart) {
	return part.fastMode ? 'gemini-3-flash-preview' : 'claude-4-sonnet'
}Alternatively, you can bypass the PromptPartUtil system by changing the getModelName.ts file to a function that returns a hardcoded value.
Support a different model
To add support for a different model, add the model's definition to AGENT_MODEL_DEFINITIONS in the models.ts file.
'claude-4-sonnet': {
	name: 'claude-4-sonnet',
	id: 'claude-sonnet-4-0',
	provider: 'anthropic',
}If you need to add any extra setup or configuration for your provider, you can add it to the AgentService.ts file.
Support custom shapes
If your app includes custom shapes, the agent will be able to see, move, delete, resize, rotate and arrange them with no extra setup. However, you might want to also let the agent create and edit them, and read their custom properties.
To support custom shapes, you have two main options:
-
Add an action that lets the agent create your custom shape.
See the Let the agent create custom shapes with an action section below.
-
Add your custom shape to the schema so that the agent read, edit and create it like any other shape.
See the Add your custom shape to the schema section below.
Let the agent create a custom shape with an action
To add partial support for a custom shape, let the agent create it with an agent action. For example, this action lets the agent create a custom "sticker" shape:
const StickerAction = z
	.object({
		_type: z.literal('sticker'),
		stickerType: z.enum(['❤️', '⭐']),
		x: z.number(),
		y: z.number(),
	})
	.meta({
		title: 'Sticker',
		description: 'Add a sticker to the canvas.',
	})

type StickerAction = z.infer<typeof StickerAction>Define how the action gets applied to the canvas by creating an action util:
export class StickerActionUtil extends AgentActionUtil<StickerAction> {
	static override type = 'sticker' as const

	// Tell the model how to use the action
	override getSchema() {
		return StickerAction
	}

	// How to display the action in chat history
	override getInfo(action: Streaming<StickerAction>) {
		return {
			icon: 'pencil' as const,
			description: 'Added a sticker',
		}
	}

	// Execute the action
	override applyAction(action: Streaming<StickerAction>, helpers: AgentHelpers) {
		if (!action.complete) return
		if (!this.editor) return

		// Normalize the position
		const position = helpers.removeOffsetFromVec({ x: action.x, y: action.y })

		// Create the custom shape
		this.editor.createShape({
			type: 'sticker',
			id: createShapeId(),
			x: position.x,
			y: position.y,
			props: { stickerType: action.stickerType },
		})
	}
}Add a custom shape to the schema
To let the agent see the custom properties of your custom shape, add it to the schema in SimpleShape.ts.
For example, here's a schema for a custom sticker shape.
const SimpleStickerShape = z
	.object({
		// Required properties
		_type: z.literal('sticker'),
		note: z.string(),
		shapeId: z.string(),

		// Custom properties
		stickerType: z.enum(['❤️', '⭐']),
		x: z.number(),
		y: z.number(),
	})
	.meta({
		// Information about the shape to give to the agent
		title: 'Sticker Shape',
		description:
			'A sticker shape is a small symbol stamped onto the canvas. There are two types of stickers: heart and star.',
})The _type and shapeId properties are required so that the app can identify your shape. The note property is also required. The agent uses it to leave notes for itself.
For optional properties, it's worth considering how the agent should see your custom shape. You might want to leave out some properties and focus on showing the most important ones. It's also best to keep them in alphabetical order for better performance with Gemini models.
Enable your custom shape schema by adding it to the list of SIMPLE_SHAPES in the same file.
const SIMPLE_SHAPES = [
	SimpleDrawShape,
	SimpleGeoShape,
	SimpleLineShape,
	SimpleTextShape,
	SimpleArrowShape,
	SimpleNoteShape,
	SimpleUnknownShape,

	// Our custom shape
	SimpleStickerShape,
] as constTell the app how to convert your custom shape into the SimpleShape format by adding it as a case in convertTldrawShapeToSimpleShape.ts.
export function convertTldrawShapeToSimpleShape(editor: Editor, shape: TLShape): SimpleShape {
	switch (shape.type) {
		// ...
		case 'sticker':
			const bounds = getShapeBounds(shape)
			return {
				_type: 'sticker',
				note: (shape.meta.note as string) ?? '',
				shapeId: convertTldrawIdToSimpleId(shape.id),
				stickerType: shape.props.stickerType,
				x: bounds.x,
				y: bounds.y,
			}
		// ...
	}
}To allow the agent to edit your custom shape's properties, tell the app how to convert your shape from the SimpleShape format that the model outputs to the actual format of your shape.
export function convertSimpleShapeToTldrawShape(
	editor: Editor,
	simpleShape: TLShape
	{ defaultShape }: { defaultShape: Partial<TLShape> }
): {
	switch (simpleShape.type) {
		// ...
		case 'sticker':
			const shapeId = convertSimpleIdToTldrawId(simpleShape.shapeId)
			return {
				shape: {
					id: shapeId
					x: simpleShape.x,
					y: simpleShape.y
					// ...
					props: {
						// ...
						stickerType: simpleShape.stickerType
					},
					meta: {
						note: simpleShape.note ?? ''
					}
				}
			}
		// ...
	}
}Further reading
-
Multiplayer Starter Kit: Use a tldraw multiplayer sync starter kit to build multi-user agent environments.
-
Shape Utilities: Learn how to create custom shapes and extend tldraw's shape system with advanced geometry, rendering, and interaction patterns.
-
Editor State Management: Learn how to work with tldraw's reactive state system, editor lifecycle, and event handling for complex canvas applications.
Building with this starter kit?
If you build something great, please share it with us in our #show-and-tell channel on Discord. We want to see what you've built!